


How do I complete the sign-up form?
Help with your Tyro application
Welcome to our application assistance page. We’ve put together answers to common questions you may have while completing your application. If you can’t find the information you need, please feel free to give us a call on 1300 00 8976. We’re here to help.
This page will guide you through the Tyro sign-up process step by step.
Introduction
In this article, we’ll guide you through the Tyro signup process.
You can pause and save your progress any time. To jump back into your application just use the unique link sent to your email or phone.
Please note, each signatory will receive their own specific link and email, please don’t forward this link to anyone else as it will overwrite your personal details. It’s best for each signatory to follow the instructions sent directly to them.
What You’ll Need
Before you start, please have the following documents and info handy:
- A copy of your photo ID, for such as your Driver’s Licence or Passport
- Expected transaction amounts
- Contact details for you and your business partners
You’ll also need to complete the application on a device with a working camera, such as a mobile phone, tablet, or laptop. This is required so you can take a selfie for ID verification during the application.
Once you have everything ready, you can start.
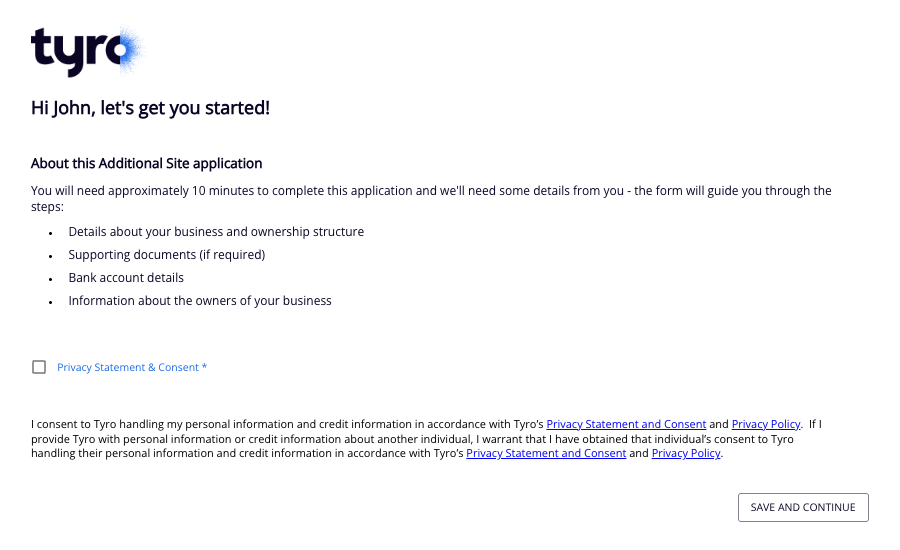
1. Welcome
The first page displays your name and includes a checkbox for agreeing to the Privacy Statement & Consent. Once you’ve checked the box, click “Save and Continue”.
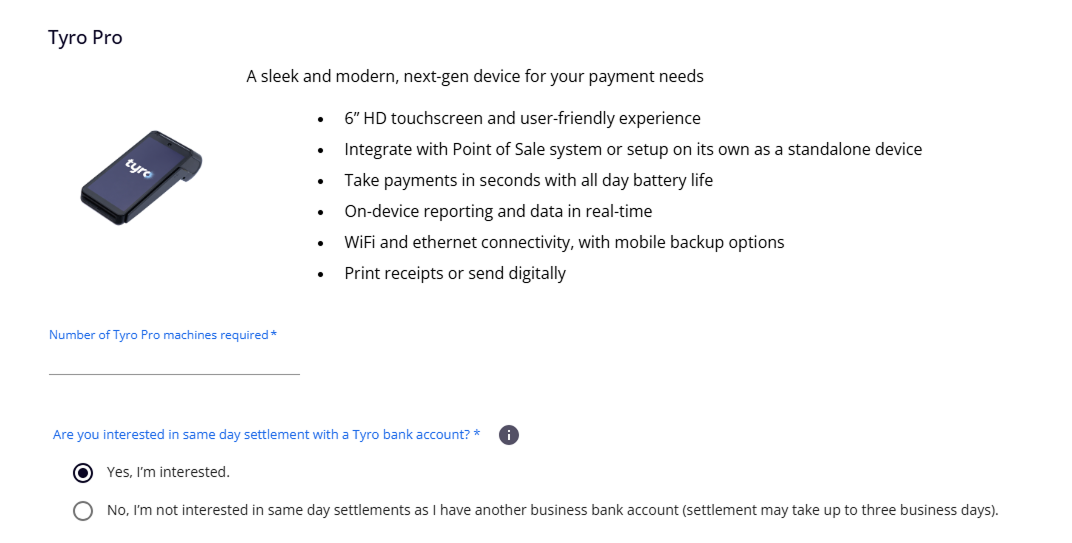
2. Choose Your Products
On this page, you’ll be asked to confirm and select the number of EFTPOS devices or services your business needs. In this example, we’re showing the Tyro Pro EFTPOS terminal and requesting one device. We also offer a Tyro Transaction Account for same-day settlements. If you want to add this to your application, just leave the option selected.
Click “Save and Continue” to move to the next step.
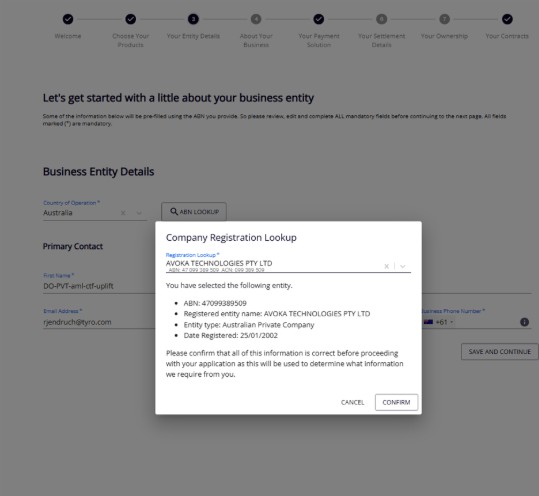
3. Your Entity Details
Next, you’ll need to confirm your ABN and primary contact details. Use the ABN Lookup feature to auto-fill your business entity information.
If your Trading or Delivery Address is different to the business registered address, you can enter it manually. You can also use a different name to appear on receipts.
Confirm if you are an overseas tax resident, then provide the primary contact name and details.
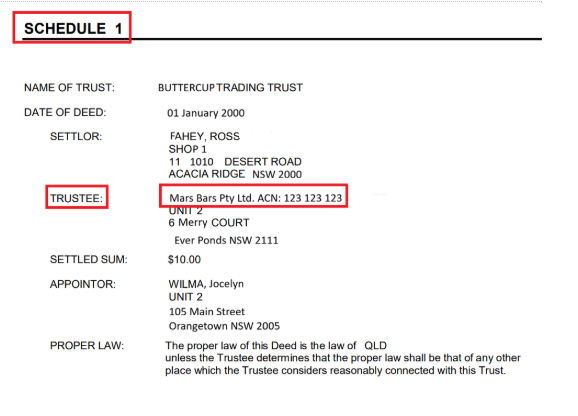
If your business is a Trust, you will also need to provide the Trustee details from the Schedule page along with a certified copy of your Trust Deed. You can locate the “Schedule” page towards the last pages of your Trust Deed.
This section will specify whether the trustee type is an Individual Trustee or an Organisation (Company) Trustee. Use these trustee details to answer the questions on the page. Click “Save and Continue” once you’re done.
Example “Schedule” page:
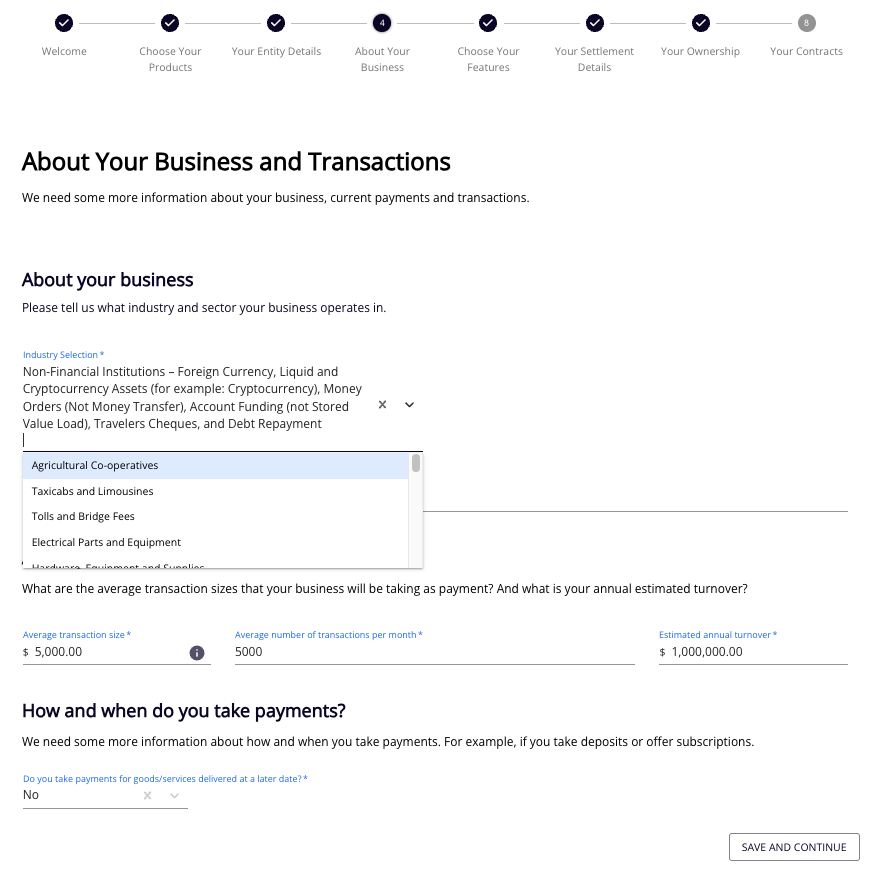
4. About Your Business and Transactions
This section is where you’ll specify your industry, expected transaction volumes, and values. First, choose your industry from the drop-down. Then, briefly summarise your business, covering the services or products you offer. You’ll then answer three questions:
- The average transaction size (e.g., $10 for a café, $10,000 for a car dealership).
- The average number of transactions per month.
- The estimated annual turnover
To work this out, take the average transaction size multiply it by the monthly transaction volume and the number of months your business operates. Finally, confirm if your business accepts payments for goods or services delivered later. Then click “Save and Continue”.
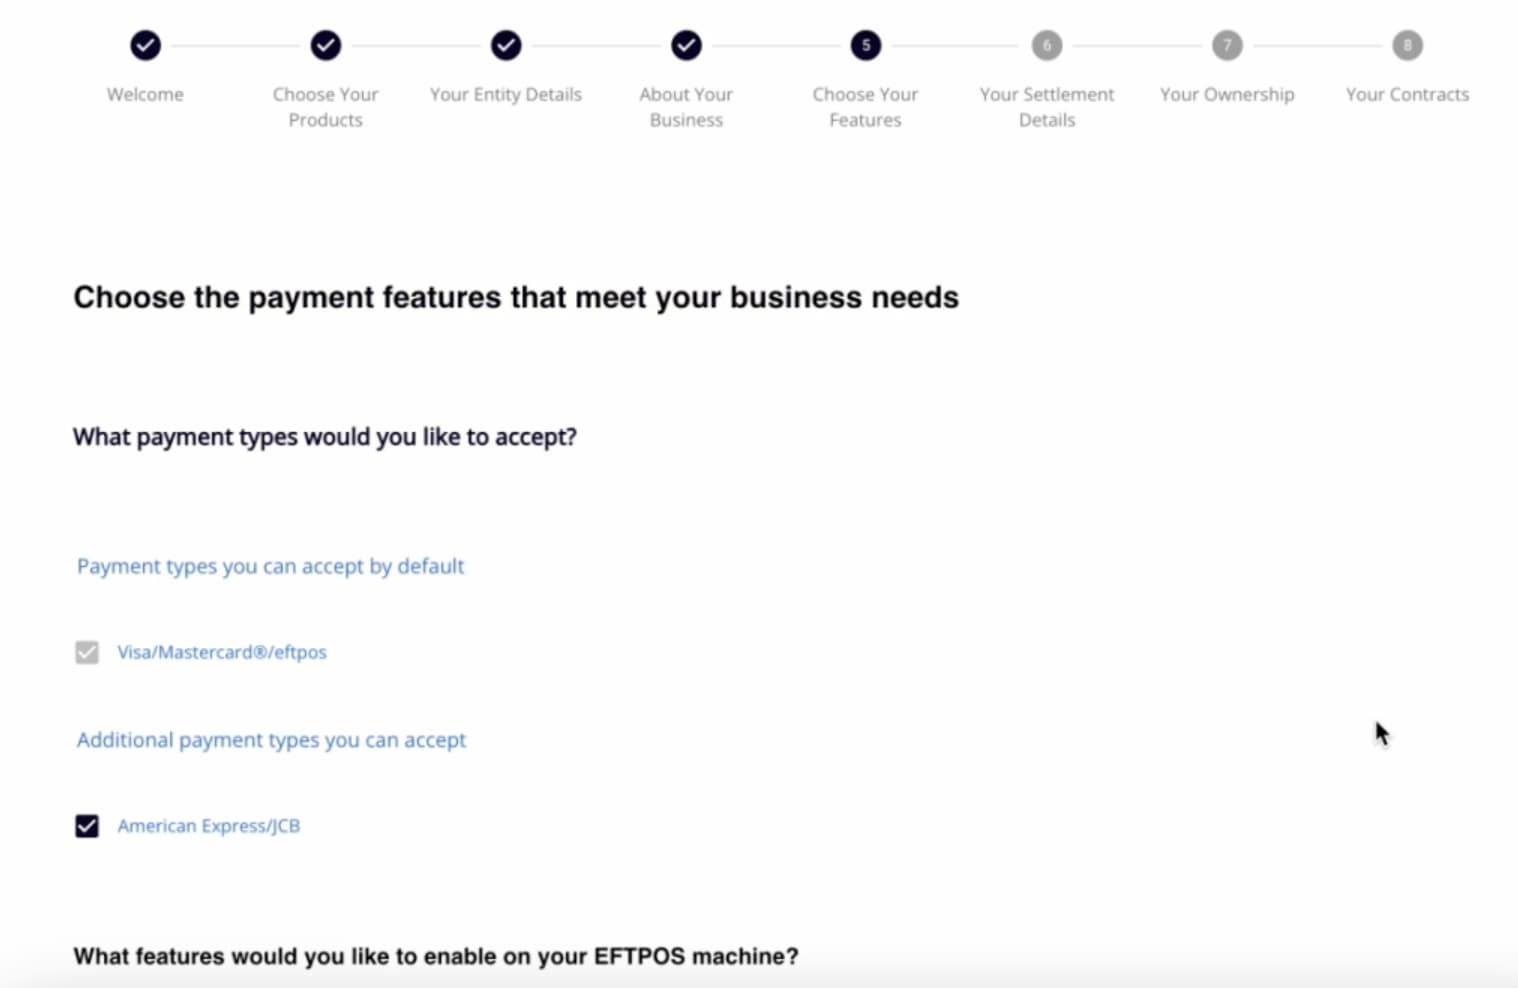
5. Choose Your Features
Here, you can select which card types your business will accept and review the pricing for each.
Visa, Mastercard, and EFTPOS are enabled by default. You can also add American Express and JCB. If your business processes Mail Order/Telephone Order (MOTO) transactions, you can set up this feature here.
The Pricing and Fees summary will confirm any monthly rental fees and the surcharges for different payment types. Click “Save and Continue”.
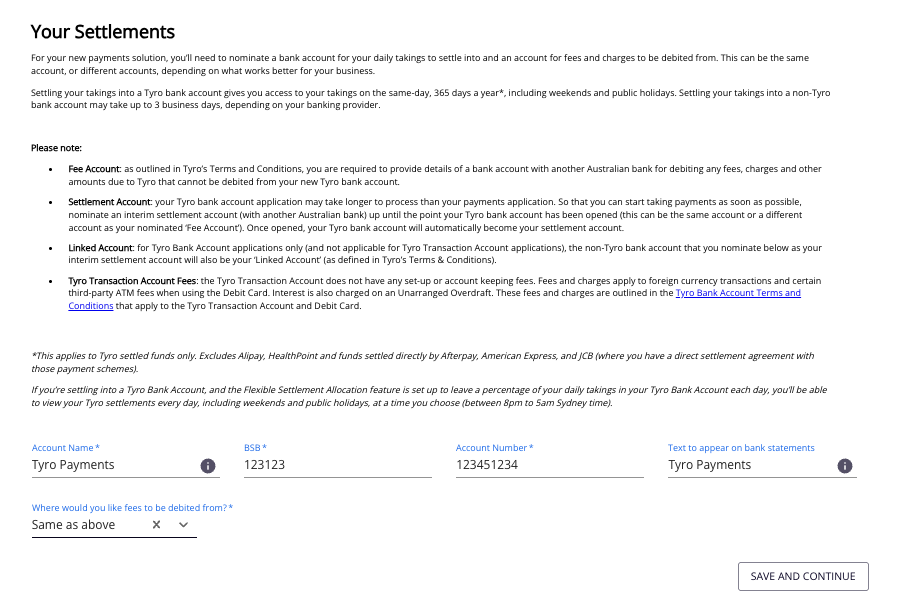
6. Your Settlement Details
This page is where you’ll link your bank account for settlements and fee payments. We’ll settle your daily takings into this account until your Tyro Transaction Account is set up, if you chose to open one.
Enter your bank account name, BSB, account number, and the reference text for your account statement. Then, choose if you’d prefer fees to be drawn from this account or your Tyro Transaction Account.
It’s worth noting that the settlement bank account must be in the same name as your business. Click “Save and Continue”.
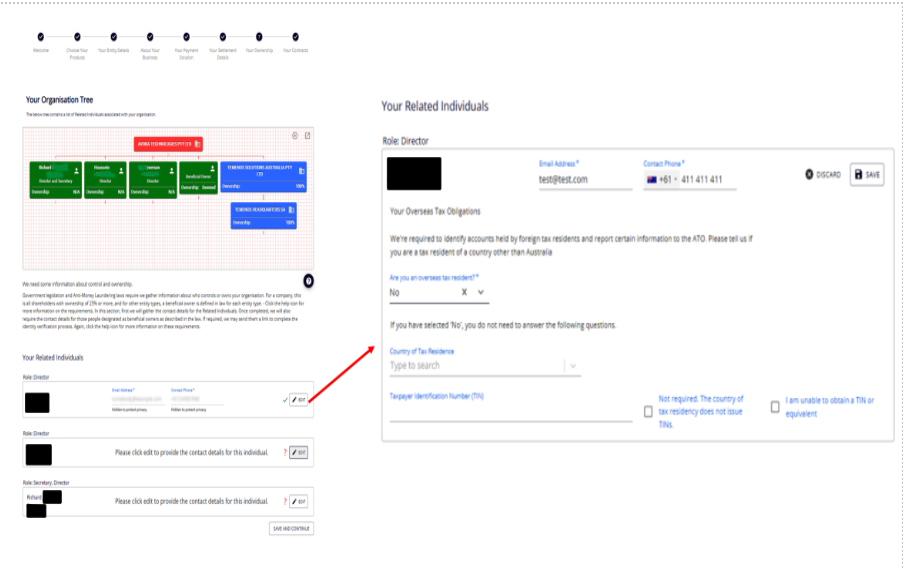
7. Your Ownership
We’ll use ASIC Connect and the ABN registry information to confirm your business structure and beneficial ownership. For example, if your company has two directors, and a company secretary, their names will appear under Related Individuals.
You’ll need to provide contact details for each related individual and beneficial owner/s, to include their email address, mobile number (not a landline), and overseas tax residency status.
If the shares in the business are non-beneficially held, we may reach out for a copy of the trust deed showing beneficial ownership of the shares. Click “Save and Continue”.
8. Your Contracts
Be sure to enable the camera on your device before starting this section.
For the final section you’ll need to submit your ID documents. Start by agreeing to the Direct Debit Authorisation Request and Merchant Declaration terms.
You’ll then be taken to the Signature page which will tell you how many signatures are required. For example, if two signatures are needed, the business owner’s signature is mandatory.
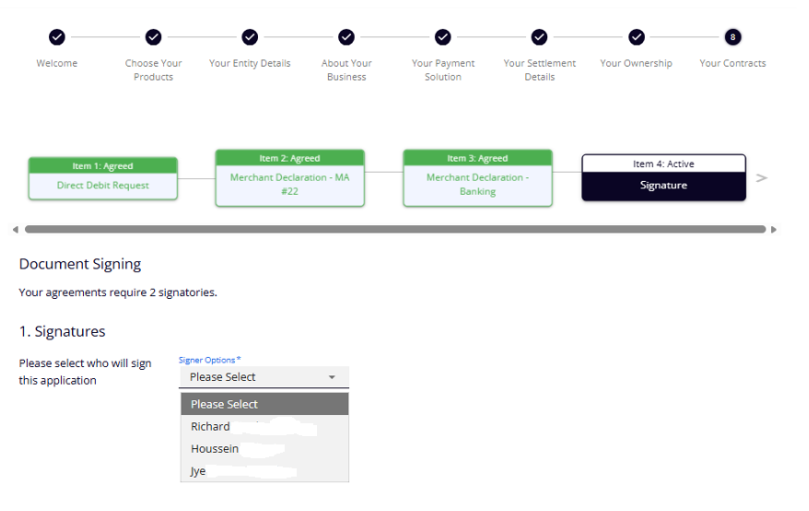
Select the signing options for each signatory based on the number of signatures required.
- Each signatory will need to confirm full name and enter contact details, DOB, Gender and Residential Address
- Each signatory will need to declare if they are an overseas tax resident – Yes or No.
Next, we need to verify your identity and will ask you to provide a copy of your photo ID, or you can use the Camera option to take a photo with your device’s camera.
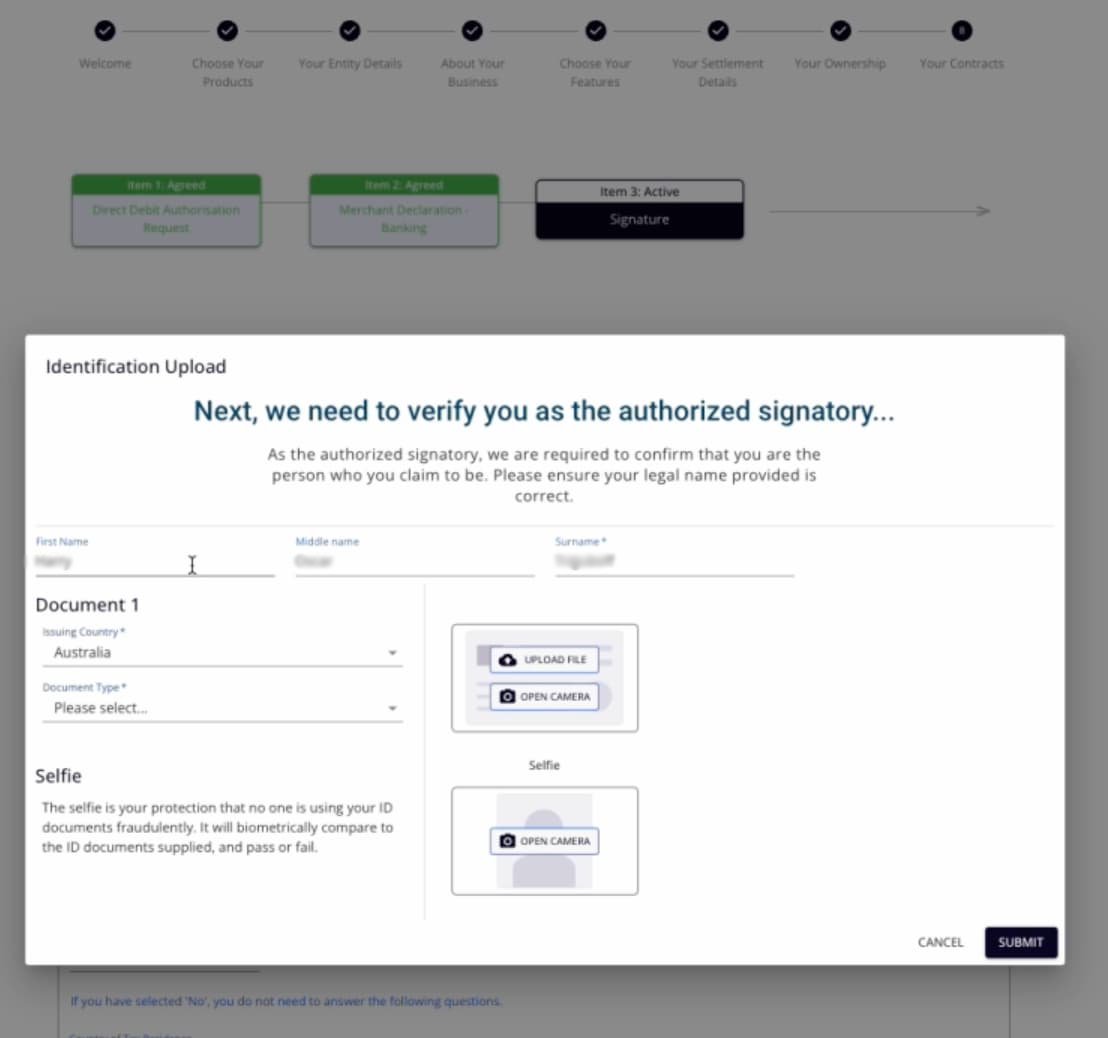
Finally, once your identity is verified, type or sign your signature then click “Submit”.
If another signatory is required, they’ll receive a separate email with their own unique link. Each signatory must use their own link. Sharing application links may delete or overwrite your responses, so please don’t forward or share them.
And that’s it.
Application Form FAQ’s
-
How do I get my application signed by a signatory?
To send the application for signing, go to page 8 of the application form and click on “Item 3: Signature. Under “Signing Options” you can select “Send to”. This action will forward the application to the selected signatory. Remember, the email will be sent to the person you’ve chosen for signing, and whose email address you entered on page 7 under “Your Related Individuals”.
-
Why is my signed form showing as incomplete?
Make sure you’ve accepted all three items on page 8: Direct Debit Authorisation Request, Merchant Declaration, and Signature. If that doesn’t work, make sure you’ve filled in all the required details in the form. Look for light grey buttons (on mobile) or black buttons (on desktop) to complete the steps.
-
Why is my bank statement not being accepted?
This most likely due to the applying entity (page 3) not matching the bank account name or because no bank statement has been uploaded (page 6).
-
What can I do if my ID is not uploading?
First, ensure that the details provided for your ID are accurate. If you see an ‘ID Verification Failed’ message, you can select “Okay” and attempt to upload three times. On the third attempt, the application will proceed, and you’ll get a pop-up saying that our verification team will manually handle the ID verification process.
-
How can I change my product selection?
Unfortunately, the chosen product type cannot be altered in the existing application. You’ll need to complete a new application, either through our website or via your Sales Agent. If you need further assistance, please call our Customer Support Team on 1300 00 8976.
-
Am I able to cancel my application?
Yes you can cancel your application. Please call our Customer Support Team on 1300 00 8976, and they’ll be happy to help.
-
I forgot to select MOTO. How do I enable this?
MOTO stands for “Mail Order/Telephone Order,” a payment method used for transactions initiated via mail or telephone when customers aren’t present at the point of sale. To enable MOTO, submit a post-boarding MOTO form. To obtain a MOTO application form, please contact our Customer Support Team on 1300 00 8976.
Keep in mind, there might be a 3-month waiting period. The feature is subject to approval as we cannot accommodate every business category. -
How do I change my delivery address?
If you’ve already submitted the application form and need to change your delivery address, please get in touch with our Customer Support Team on 1300 00 8976. They’ll assist you with updating the delivery address.
-
My business category is not listed. What do I do?
If you can’t find a specific category for your business, you can select a category that is similar to your business type. For Health practices specifically, Tyro Health has a specific guide for Health industry selection